Exposure Triangle for Landscape Photography: Aperture, Shutter Speed & ISO Explained
Stop shooting in Auto. Forty years on the Atlantic coast, one balancing act — aperture, shutter speed and ISO.
Mastering the exposure triangle is the single most important step for any landscape photographer moving beyond Auto mode. Get it right, and you can freeze a wave breaking on granite, let wind-blown grass soften into a painterly blur, or hold every plane of a scene — from the foreground rockpool to the horizon — perfectly sharp. Get it wrong, and the same scene falls flat.
Digital photography may seem like a clean break from film. In reality, it’s a high-tech love letter to its chemical ancestor — visible in the way cameras feel in your hand and in the math behind the sensor. Understanding exposure properly bridges your knowledge between traditional and digital technique, and here’s how the “old school” still shapes the “new school.”
When I started photography, 40 years ago now, the question of exposure didn’t really arise — I had a very basic camera, and the only choice available to me was to compose and press the shutter.

Very quickly, my first reflex camera opened up new questions: what do we do with these three adjustment options? My Pentax P30 let me adjust the aperture. I could also adjust the speed. And of course, I chose the sensitivity of the film itself.
With each image, I understood the impact of choosing different speeds and apertures, and how much that choice affected the final result. I quickly gravitated towards landscape photography, often choosing small apertures and slow speeds.
Unfortunately, I lost many of my slides from that time, including those from a trip to Quebec and stays in Scotland. I’m far more careful with my digital files today, and my backup system is solid — disks, redundancy, the lot.
The Language of the Sensor
The foundations of digital imaging are borrowed directly from the physical properties of 35mm film. The same exposure principles apply whether you’re shooting on film or a digital sensor.
- Full-Frame Standards match the standard of a single frame of 135 film. Leica established this standard in the 1920s.
- ISO Ratings: In the film days, ASA/ISO referred to how sensitive the silver halide crystals were to light. Digital cameras kept this scale so photographers wouldn’t have to relearn how to expose an image.
- Crop Factors: Lenses are still measured by focal lengths (like 50mm) based on how they behaved on film. If a sensor is smaller than a film frame, we use a “crop factor” to describe the difference.
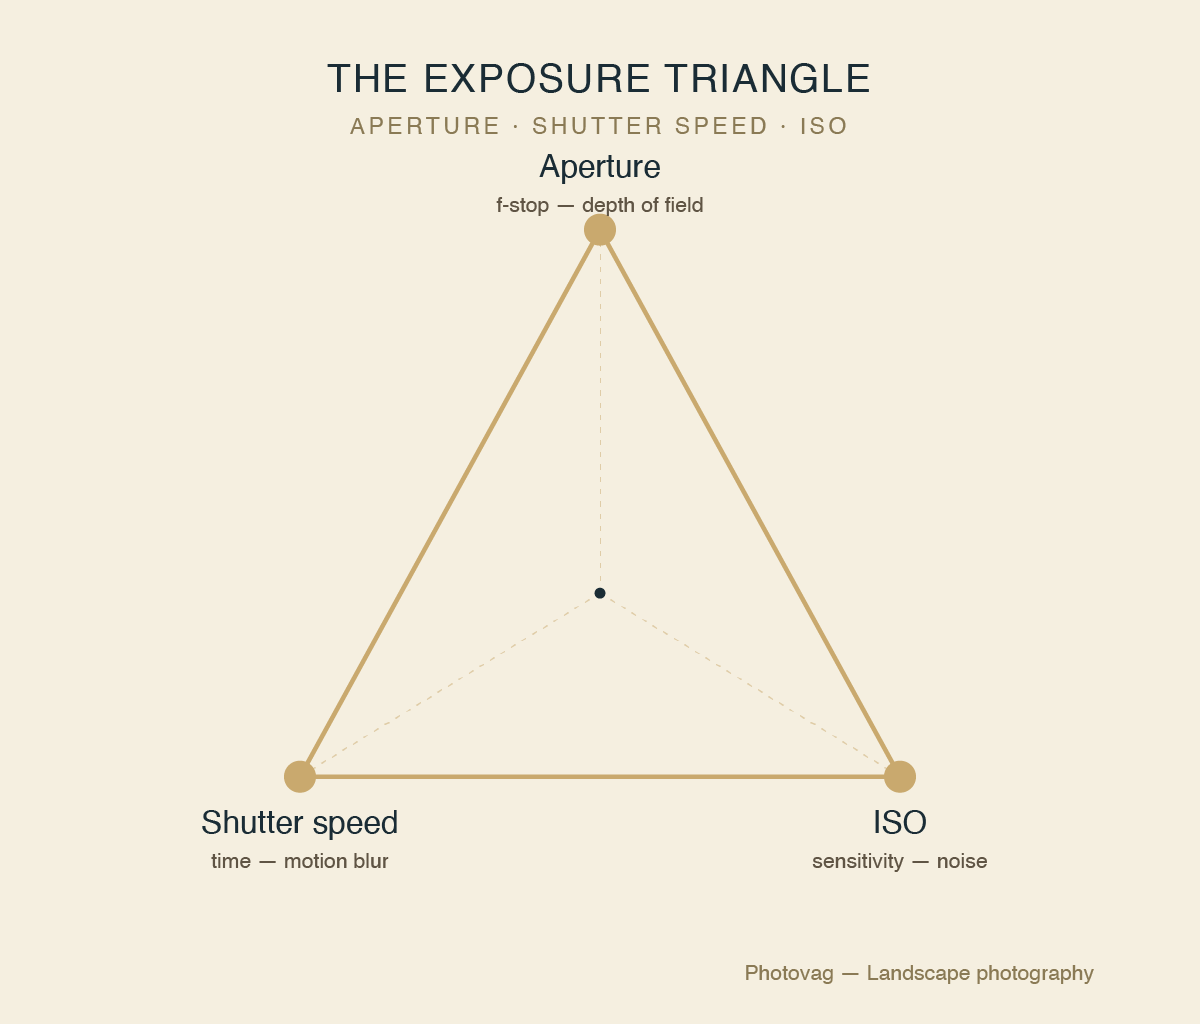
You’ve surely encountered three terms if you’ve ever exited the “Auto” mode of your camera: Aperture, Shutter Speed, and ISO. Together, they make up the Exposure Triangle — and once you understand it, you take control of these settings for creative results.

Think of these three elements as the pillars that support the brightness of your image. Modify one, and you generally need to adjust the others to keep the balance. For anyone starting out, understanding how this works brings real clarity to your creative process.
Effect of Aperture (The Diaphragm) on the Exposure Triangle
The aperture is the size of the opening in the lens that lets in light. It’s measured in f/number (e.g., f/1.8, f/8, f/22). Setting the aperture is one part of controlling exposure — and, for a landscape photographer, the part that decides how much of your scene is in focus.
- The smaller the number (f/1.8): The aperture is large. A lot of light enters. It’s ideal for background blur (bokeh).
- The larger the number (f/22): The aperture is small. Little light enters. Everything is sharp, from the foreground to the horizon.
Most landscape photographers rarely push all the way to f/22. The sharpness sweet spot on most lenses sits around f/8–f/11 — push past it and diffraction starts softening fine detail across the whole frame. I keep f/22 in reserve for the rare scene where I genuinely need every last bit of depth of field.


The quality of a lens mainly lies in its brightness, and therefore in its maximum aperture. A classic series “opens” at f/4, while bright lenses allow for an aperture of f/2.8. For my part, the lenses on my two Canon cameras open at f/4, my Leica opens at f/1.8, and the one mounted on my Nikon FM has a maximum aperture of f/1.4.
Effect of Shutter Speed (Time) on the Exposure Triangle
Shutter speed is the duration the sensor is exposed to light, expressed in fractions of a second (e.g., 1/1000s, 1/30s). It’s the second pillar of the balancing act — and on the coast, it’s the setting that decides whether the wind in the grass becomes a blur or a freeze.
- Fast shutter speed (1/1000s): “Freezes” motion. Essential for sports, birds in flight — or grass whipping in an Atlantic gale, if that’s the look you want.
- Slow speed (1/10s or several seconds): Creates artistic blur, or lets you capture stars at night. A tripod is usually essential. In this example, a low speed makes the bus look like a ghost.
Wide-open daylight makes long exposures impossible — there’s simply too much light for a slow shutter speed without blowing the image out. That’s where ND (neutral density) filters come in: they cut the light reaching the sensor so you can drag the shutter for 10, 30, even 60 seconds in broad daylight, turning moving water into something silky and still. I cover the full system — stops, exposure calculation, tide technique — in my guide to ND filters for long exposure coastal photography.


Effect of ISO (Sensitivity) on the Exposure Triangle
ISO represents the sensitivity of the sensor to light. Adjusting it gives you flexibility in challenging lighting conditions — the third lever in the balancing act.
- Low ISO (100–200): Ideal in full sunlight. The image is clean and sharp.
- High ISO (3200–6400): Lets you photograph in low light. Be careful of digital noise — those little grains can spoil image quality.
How to balance the triangle?
This is where the magic (and the frustration) begins. Exposure is a matter of compromise, and balancing these three elements is what determines the final image quality.
The golden rule: If you close your aperture by two stops, you reduce the light. You must slow down your shutter speed or increase your ISO to compensate and keep the same brightness.
| Action | Effect on light | Creative consequence |
|---|---|---|
| Opening diaphragm | Increase | No more blur |
| Increase speed | Decrease | Freeze the movement |
| increase ISO | Increase | Higher grain |
What to do if you’re a landscape photographer?
While we’ve already seen how important composition is, let’s go a little deeper on how to use these three settings together in the field.
In landscape photography, we generally want maximum depth of field — sharp across every plane. As covered above, that means working at f/8 or f/11 rather than pushing all the way to f/22, where diffraction starts to bite.
We’ve talked before about the f/64 group — photographers who worked with large-format cameras and could stop down further than our modern lenses allow, while keeping everything razor-sharp.

Sometimes we want a different effect altogether. Here, a wide aperture leaves part of the scene in artistic blur — this image was taken on the Scottish moor, with a hint of the Isle of Lewis behind it.

And when you want a longer exposure in bright daylight, this is exactly where an ND filter earns its place in your bag. For this long-exposure image, a 10-stop ND filter let me hold the shutter open for 12 seconds, giving the ocean its milky, drawn-out look.

In summary
Learning the exposure triangle means moving from being a spectator to being a creator. You decide whether you want a portrait with a blurred background, or a waterfall with a silky water effect. Ultimately, mastering this balance lets you achieve your creative vision with every shot.

Explore how these principles shape my own coastal work.
View the portfolio →
Leave a Reply