Category: Landscape Photography

Field guides, techniques, and inspiration for landscape photographers. From reading tides and light on the Brittany coast to capturing the raw beauty of the Scottish Highlands.

  • Hyperfocal Distance

    Hyperfocal Distance

    photovag.art  ·  Technique Series

    The Definitive Practical Guide for Landscape Photographers

    Olivier · Technique – Advanced – ~3,000 words

    1. Why Sharpness Fails at the Horizon

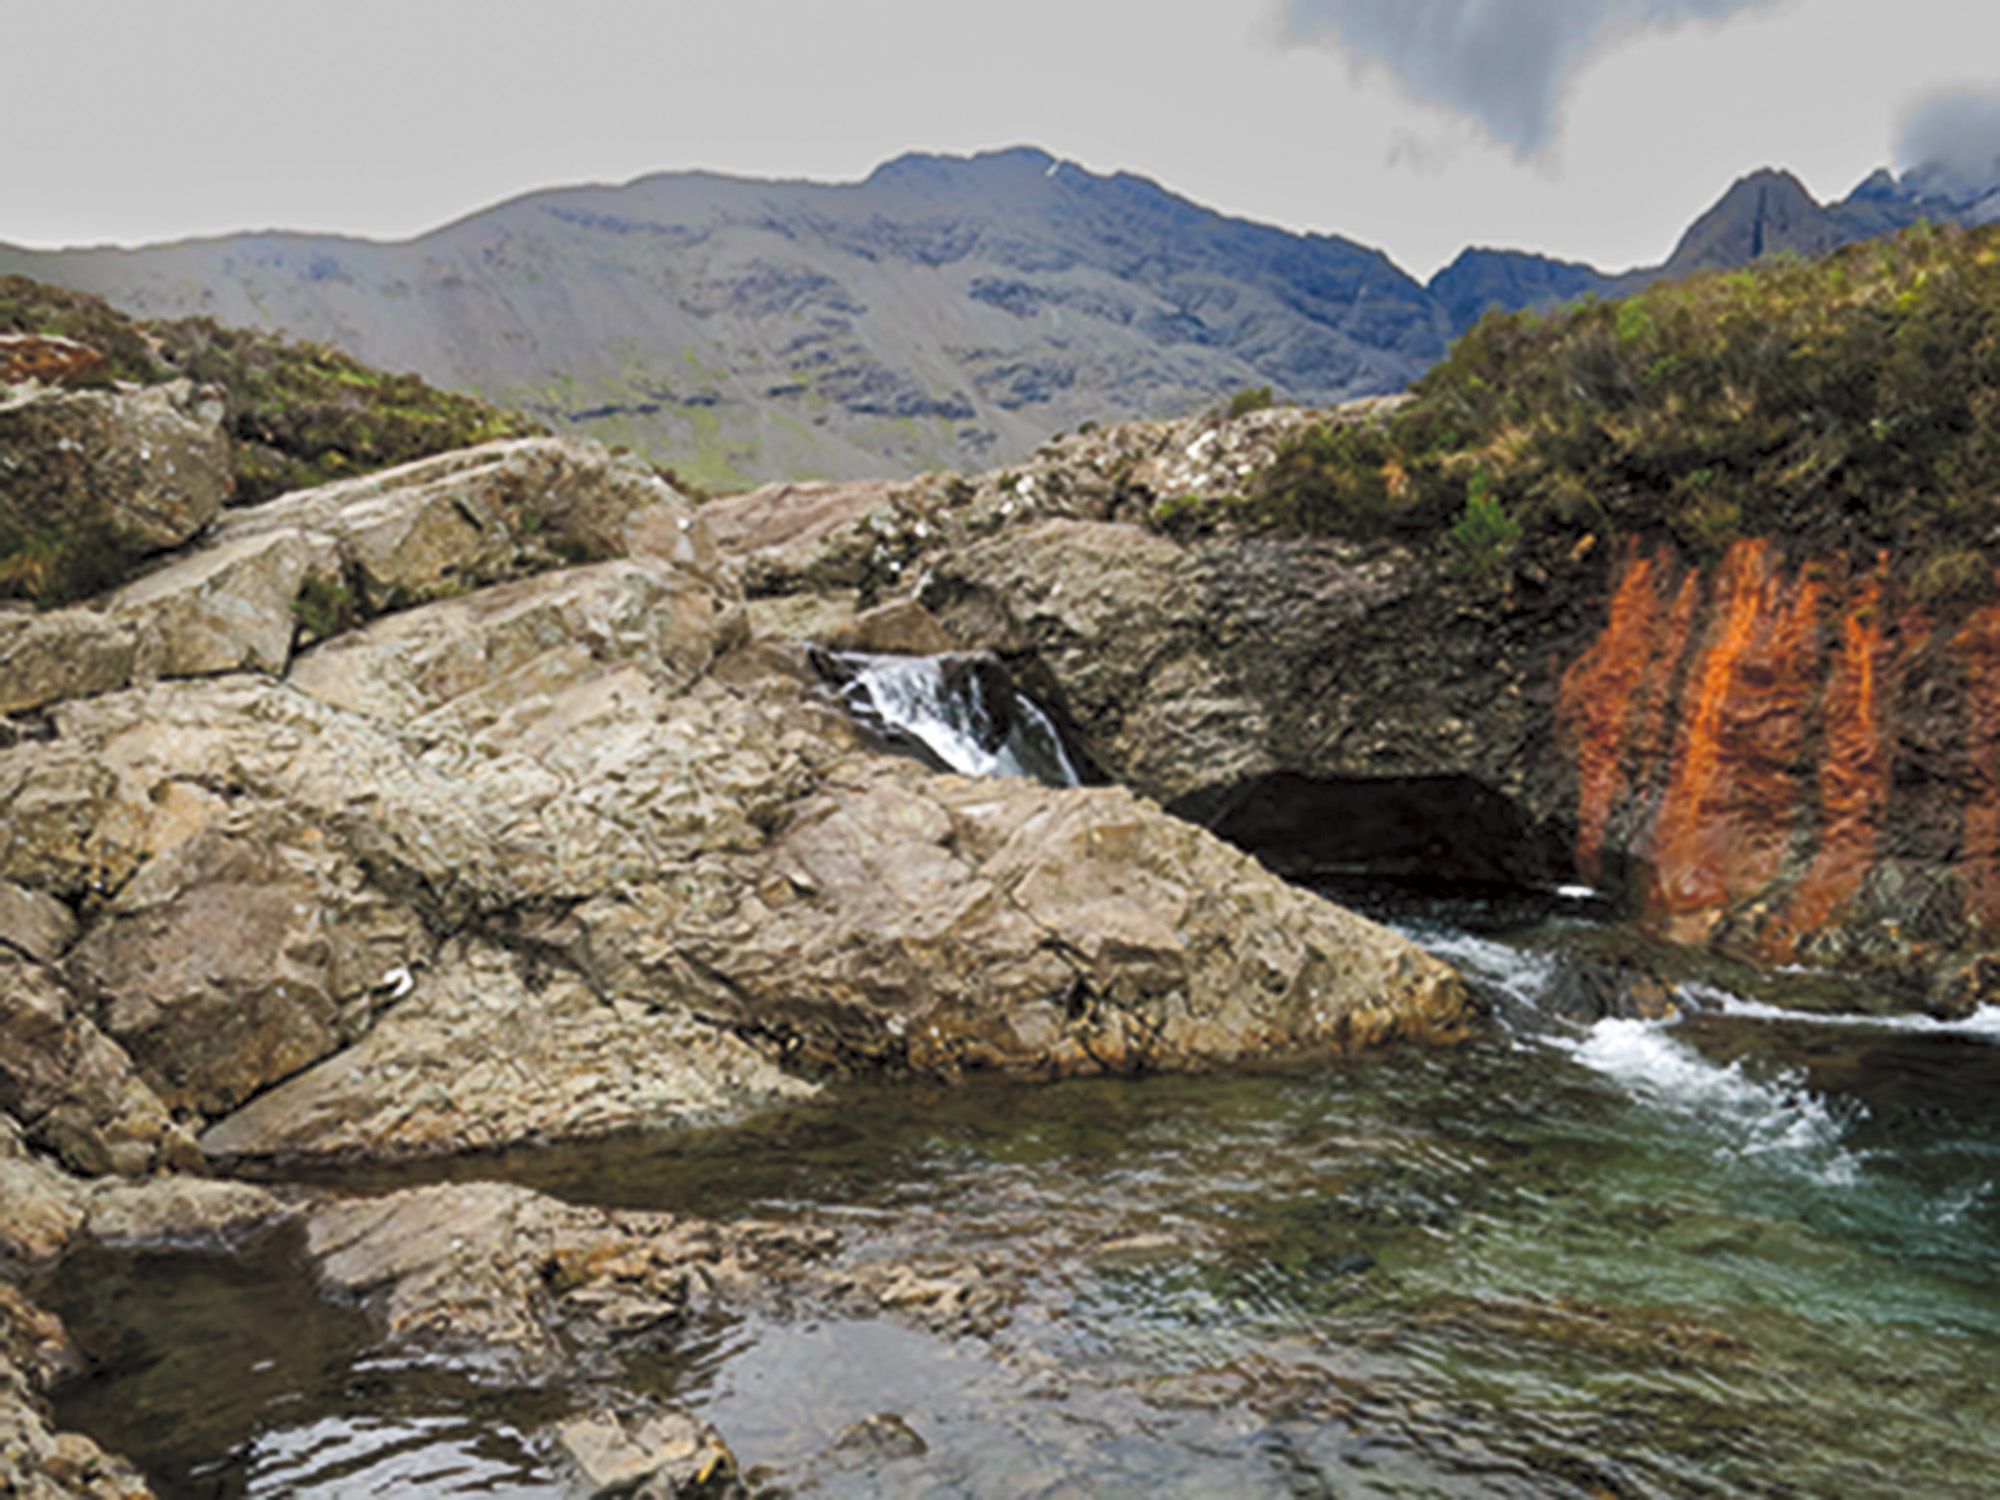
    Dawn on Elgol – Skye. The tide is low, the granite boulders glow pink in the first light, and a thin mist hangs over the Atlantic. You set your camera on the tripod, stop down to f/16 for maximum depth of field, lock focus on the horizon, and press the shutter. Back home, you zoom in — and the foreground rocks are soft. Not dramatically blurred, just… unsharp. Frustrating. Fixable.

    This is the single most common sharpness failure in landscape photography, and it has nothing to do with camera shake, lens quality, or diffraction. It comes from misunderstanding where to focus.

    When you point your lens at infinity, your depth of field extends from a certain near distance all the way to ∞ — but that near limit may be further away than your foreground subject. The solution is a concept that has been central to photographic optics since the 19th century: the hyperfocal distance.

    This guide covers everything you need: the theory, the formula, the charts, and — most importantly — how to apply it in the field on the Atlantic coast, the Scottish Highlands, or wherever your landscape photography takes you.

    2. What Is Hyperfocal Distance?

    The Core Concept

    The hyperfocal distance (HFD) is the closest focusing distance at which objects at infinity still appear acceptably sharp.

    Put differently: when you focus your lens at the hyperfocal distance, your depth of field extends from half that distance all the way to infinity. This gives you the maximum possible depth of field for any given focal length and aperture combination.

    Why does this matter? Because in landscape photography, you typically want everything sharp — from the nearest rock or wave in the foreground to the distant headland or mountain on the horizon. The hyperfocal distance is the precise point that achieves this.

    Acceptable Sharpness and the Circle of Confusion

    The phrase “acceptably sharp” is key. In optics, a point source of light that is out of focus is rendered as a small disk called the circle of confusion (CoC). As long as this disk is small enough to be indistinguishable from a sharp point when the image is viewed at normal print or screen size, we consider it acceptably sharp.

    The maximum acceptable CoC diameter depends on the sensor size — larger sensors produce larger prints from the same number of pixels, so the CoC threshold is proportionally larger. This is why sensor format is a critical variable in the hyperfocal calculation.

    Standard industry CoC values by format:

    Format Sensor Size CoC Value Example Cameras
    Full Frame (35mm) 36 × 24 mm ~0.030 mm Canon R6, Nikon D800, Sony A7
    APS-C 23.5 × 15.6 mm ~0.020 mm Canon 77D, Nikon D500, Fuji X-T5
    Micro Four Thirds 17.3 × 13 mm ~0.015 mm Olympus OM-1, Panasonic GH6

    Note: These values assume an 8×10 inch print viewed at 25 cm — the traditional standard. For very large prints or pixel-peeping on screen, use a smaller CoC (e.g. 0.020 mm for full frame) for more conservative results.

    3. The Math Behind Hyperfocal Distance

    The Formula

    The hyperfocal distance is calculated as:

    f = focal length (mm)  ·  N = aperture f-number  ·  c = circle of confusion (mm)
    • H = Hyperfocal distance (mm, then convert to metres)
    • f = Focal length (mm) — the actual focal length, not 35mm equivalent
    • N = Aperture f-number (e.g. 11 for f/11)
    • c = Circle of confusion diameter (mm) — depends on your sensor format

    Step-by-Step Example

    Camera: Canon R6 (Full Frame)  ·  Lens: 24mm  ·  Aperture: f/11

    1. Identify your values: f = 24, N = 11, c = 0.030 (full frame)
    2. Square the focal length: 24² = 576
    3. Multiply N × c: 11 × 0.030 = 0.33
    4. Divide: 576 ÷ 0.33 = 1,745 mm
    5. Convert to metres: 1,745 ÷ 1,000 = 1.75 m
    Focus at 1.75 m, and everything from 0.87 m to ∞ will be acceptably sharp.

    This is a remarkable result: with a 24mm lens at f/11, simply focusing at less than 2 metres in front of you gives you infinite depth of field. On a rocky Breton shoreline, that typically means focusing on a boulder or rock pool a short distance away — not the horizon.

    📷 Field Note — APS-C Correction
    Shooting on a Canon 77D or Nikon D500? Use c = 0.020 mm. The same 24mm lens at f/11 gives H = 24² ÷ (11 × 0.020) = 576 ÷ 0.22 = 2,618 mm → 2.6 m. Slightly farther than full frame, but still very manageable.

    4. Hyperfocal Distance Reference Charts

    Full Frame (c = 0.030 mm)

    Focus at the distance shown to achieve sharpness from half that distance to infinity.

    Full Frame — Hyperfocal Distance (metres)
    f \ mm 16mm 24mm 35mm 50mm
    f/5.6 1.5 m 3.4 m 7.3 m 14.9 m
    f/8 1.1 m 2.4 m 5.1 m 10.4 m
    f/11 0.78 m 1.7 m 3.7 m 7.6 m
    f/16 0.53 m 1.2 m 2.6 m 5.2 m
    f/22 0.39 m 0.87 m 1.9 m 3.8 m

    APS-C (c = 0.020 mm)

    For Canon APS-C (c = 0.022 mm), results will be slightly longer than shown.

    APS-C — Hyperfocal Distance (metres)
    f \ mm 16mm 24mm 35mm 50mm
    f/5.6 2.3 m 5.1 m 10.9 m 22.3 m
    f/8 1.6 m 3.6 m 7.7 m 15.6 m
    f/11 1.2 m 2.6 m 5.6 m 11.4 m
    f/16 0.8 m 1.8 m 3.8 m 7.8 m
    f/22 0.58 m 1.3 m 2.8 m 5.7 m

    How to Read These Tables

    Find your focal length column, then your aperture row. The value shown is where you should focus. Everything from half that distance to infinity will be acceptably sharp.

    Example: Full frame, 16mm at f/11 → HFD ≈ 0.9 m. Focus 90 cm in front of your camera and you have total sharpness from 45 cm to the horizon.
    📷 Field Note — Isle of Skye, Loch Coruisk
    Shooting wide (16mm) at the shoreline of Loch Coruisk, the Black Cuillin reflected in still water. Full frame, f/11: hyperfocal distance is around 0.9 m. The closest pebble in the foreground was roughly 60 cm away — just beyond the half-HFD near limit. One focus point. Perfect sharpness from foreground to ridge.

    Photo 1 — Is everything sharp? · Skye 2009
    Recommandé : 1200 × 800 px · paysage
    Alt text suggéré : “Loch Coruisk foreground pebbles and Black Cuillin ridge in focus, Isle of Skye — hyperfocal distance landscape photography”

    Loch Coruisk, Isle of Skye
    Focus locked at hyperfocal distance — foreground pebbles to Cuillin ridge, all sharp in a single exposure.

    16mm·f/11·Full Frame·HFD 0.9 m

    5. How to Apply Hyperfocal Distance in the Field

    Method 1: Manual Focus Using Your Lens Distance Scale

    Many prime lenses and some zooms have a distance scale on the focus ring. This is the traditional and most reliable method:

    • Calculate (or look up) your HFD before shooting
    • Switch to manual focus
    • Turn the focus ring until the distance marker aligns with your HFD value
    • Shoot — no need to refocus unless your focal length or aperture changes

    Limitation: Modern mirrorless lenses often have no distance scale, or a very coarse one. Use Method 2 in that case.

    Method 2: Smartphone Apps

    The fastest method on location. Two apps stand out:

    • PhotoPills: Includes a depth of field calculator with HFD. Enter your camera body (CoC auto-filled), focal length, and aperture. Also integrates with tide and sun/moon planners — ideal for coastal work.
    • Landscape Pro (iOS): Specifically designed for landscape photographers. Includes golden hour, blue hour, and HFD calculations in one interface.

    Method 3: The “One-Third Rule” — And Why It Falls Short

    You may have heard: “focus one-third into the scene.” This is a useful rough guide, but it is not equivalent to the hyperfocal method and frequently produces softer foregrounds than optimal.

    The one-third rule ignores focal length, aperture, and sensor format entirely. On a misty morning at Pointe de Pen-Hir with a 35mm lens at f/8, the hyperfocal distance is around 5 metres. The one-third rule applied to a 30-metre scene would put your focus at 10 metres — which places your 5-metre foreground rocks well outside the near depth-of-field limit. Use the formula.

    Terrain-Specific Tips

    • Rocky shoreline (Finistère / Skye): Foregrounds are typically 0.5–2 m away. A 16mm or 24mm lens at f/8–f/11 gives HFD well under 2 m on full frame — very manageable.
    • Open moorland / heath (Scottish Highlands): A 24mm at f/11 on full frame (HFD 1.75 m) works well. But on compressed views with a 50mm lens, HFD rises sharply — consider focus stacking instead.
    • Beach with sweeping foreground: Identify a textured element (a stone, seaweed line) as your near focus anchor, measure distance mentally or by pace, and verify with your app.
    • Tidal pools (Crozon Peninsula): Often 1–3 m from your tripod. At 16–24mm, even f/8 places the HFD within this range. This is hyperfocal photography at its most practical.

    Photo 2 — Focus from foreground to background · Skye 2009
    Recommandé : 1200 × 800 px · paysage
    Alt text suggéré : “Rocky coastal foreground sharp to horizon, Isle of Skye — depth of field landscape photography technique”
    Isle of Skye — Rocky Coastline
    Foreground to background sharpness achieved through hyperfocal focusing — the technique in practice on location.

    24mm·f/11·Full Frame·HFD 1.75 m
    📷 Field Note — Porspoder, Long Exposure at Dusk
    ND filter on a 16mm lens, f/11, full frame. Hyperfocal distance: approximately 0.9 m. The closest pool edge was just over a metre away. Focus locked at HFD, 90-second exposure on a calm evening — the long exposure smoothed the water surface while maintaining edge-to-horizon sharpness throughout.

    6. Hyperfocal Distance & Lens Sharpness: The Real Trade-Off

    The Diffraction Limit

    Stopping down to f/16 or f/22 reduces the hyperfocal distance — making it easier to include close foregrounds within your depth of field. But there is a hidden cost: diffraction.

    As aperture decreases (higher f-number), light bends more, causing diffraction blur that affects the entire image — not just areas that are geometrically out of focus. On high-resolution sensors (42 MP+ full frame, 26 MP+ APS-C), diffraction becomes visible at f/11 and significantly degrades sharpness by f/16.

    Finding the Sweet Spot

    In practice, the best aperture balances depth of field against diffraction:

    • Full frame, 24–50 MP: f/8 to f/11 is the typical sweet spot. Test your own sensor.
    • Full frame, 12–24 MP: f/11 to f/16 remains usable.
    • APS-C, 20–26 MP: f/8 is often the sharpest; f/11 still good.
    • Micro Four Thirds: Diffraction appears earlier; f/5.6 to f/8 recommended.
    The practical solution: calculate HFD at f/8 or f/11 first. If your foreground element is beyond the near depth-of-field limit, stop down further or consider focus stacking (two shots at different focus distances, merged in post).

    Test Your Own Gear

    • Set up a scene with near and far elements (a map at 1 m, a textured wall at 5 m)
    • Shoot the same composition from f/4 to f/22 in one-stop increments
    • Compare at 100% zoom: note where diffraction begins to soften the overall frame
    • Mark that aperture. It is your diffraction limit for that body/lens combination.

    7. Common Mistakes — and How to Fix Them

    Mistake 1: Focusing at Infinity

    When focused at ∞, the far end of your depth of field extends beyond infinity — which wastes potential depth of field. The near limit of sharpness is much farther away than it needs to be, leaving your foreground soft.

    Fix: Focus at the HFD. This shifts the near limit much closer, while still keeping ∞ within the acceptable sharpness range.

    Mistake 2: Confusing HFD with the Optimal Focus Point

    The HFD is the focus distance that maximises depth of field. But if your foreground is beyond the HFD near limit (= HFD ÷ 2), you don’t need to focus at HFD — you can focus closer and still have everything sharp. HFD is a maximum range tool, not a fixed instruction.

    Fix: Identify your actual nearest foreground element. If it is farther than HFD ÷ 2, you can focus anywhere between it and infinity and still get a sharp result.

    Mistake 3: Ignoring Sensor Format

    Using full frame CoC values for an APS-C sensor (or vice versa) gives incorrect HFD calculations, leading to systematic front- or back-focus errors.

    Fix: Always check your camera format before calculating. In PhotoPills, select your exact camera body — it fills in the correct CoC automatically.

    Mistake 4: Forgetting the Focal Length Factor

    At 100mm and f/11 on full frame, HFD exceeds 30 metres — you simply cannot get near and far sharp in a single exposure without focus stacking.

    Fix: For focal lengths above ~50mm on full frame, check the chart first. If HFD exceeds scene depth, switch to focus stacking.

    8. Conclusion: Five Things to Do Differently Starting Now

    1. Calculate before you shoot. Take 30 seconds with PhotoPills or a mental calculation. Know your HFD before you approach the scene.
    2. Stop using the infinity mark as a focus target. Focus at the hyperfocal distance instead — it’s always closer than infinity.
    3. Respect the diffraction limit. For most modern cameras, f/8 to f/11 is the sweet spot. Stopping down further rarely helps and often hurts.
    4. Learn your sensor format’s CoC. Full frame: 0.030 mm. APS-C: 0.020 mm. These numbers are the foundation of every calculation.
    5. For telephoto compositions, focus stack. Above 50mm, single-shot HFD is often not viable. Plan for a two-shot stack instead.

    Mastering hyperfocal distance transforms one of the most common field frustrations into a systematic, repeatable solution. Combined with an understanding of tidal timing, golden hour light, and ND filtration — the three pillars of coastal landscape work — it becomes part of an integrated approach to making images that are technically flawless and emotionally powerful.

    Free Download
    Tide, Light & Timing

    Depth of field is only one part of a perfect coastal image. Download the free guide and learn how to plan your coastal shoots around tides, golden hour windows, and weather — so that when you arrive, the light is right and your technique is ready.

    Get the Free Guide →


  • Introducing The Photographer’s Letter — A Weekly Newsletter for Landscape Photographers

    Introducing The Photographer’s Letter — A Weekly Newsletter for Landscape Photographers

    There is something I have always believed: the best photographs are never accidents. They are the result of preparation, patience, and a deep understanding of the natural world — the tides, the light, the wind.

    After forty years photographing coastlines — from the wild Atlantic shores of Brittany to the dramatic landscapes of the Isle of Skye — I have built a system. A way of reading a location before I even pick up my camera. A method for never wasting a golden hour.

    Starting this week, I am sharing that system — and much more — every week, directly in your inbox.

    Introducing The Photographer’s Letter

    The Photographer’s Letter is the weekly newsletter of Photovag.art. It is built for intermediate landscape photographers who want to shoot better, plan smarter, and stay connected to what is happening in the world of photography.

    Every Saturday morning, you will receive a single, carefully curated email covering four things:

    1. Landscape Photography News

    The week’s most relevant stories from the landscape and nature photography world — new techniques gaining traction, exhibitions worth knowing about, and creative trends shaping how photographers see and work. No noise, no clickbait. Only what actually matters to a photographer who shoots outdoors.

    2. Gear Updates — Canon & Leica

    I shoot Canon and follow Leica closely. Each week I summarise the most significant gear news for both systems — new releases, firmware updates, rumours worth taking seriously. Whether you are considering a new body or simply curious about where mirrorless is heading, this section keeps you informed without drowning you in spec sheets.

    3. Fresh Articles from Photovag.art

    Every issue highlights the latest articles published on the site — field guides, technique breakdowns, location reports, and behind-the-scenes insights from my own shoots. If you missed something during the week, the newsletter makes sure you don’t.

    4. The 7-Day Weather Forecast for Photographers

    This is perhaps the most practical section of all. Each week I include a detailed 7-day forecast for two coastal locations I photograph regularly: Brest, Brittany and Portree, Isle of Skye. Temperature, precipitation, wind speed — everything you need to decide whether Monday morning is worth setting the alarm for 5am.

    If you shoot in other locations, the forecasts still serve a purpose: they illustrate how to read weather windows for coastal photography, and the logic applies anywhere in the world.

    Why Subscribe?

    There is no shortage of photography content online. What is rare is perspective — the kind that comes from decades of field experience, not from aggregating press releases.

    The Photographer’s Letter is written by a single photographer, for photographers who take their craft seriously. It is not a marketing email. It is not sponsored content. It is the kind of weekly note I would want to receive myself.

    It is free. It arrives once a week. You can unsubscribe at any time.

    Your Free Welcome Gift

    When you subscribe, you will receive a free copy of Tide, Light & Timing — The Coastal Photographer’s Field Guide.

    This guide distils forty years of coastal photography into a practical, five-step method for planning and executing a successful shoot at the water’s edge. It covers how to read tide coefficients, identify the best light windows, build your kit list, and make the most of the conditions you find on arrival.

    It is the guide I wish I had had in 1983.

    Ready to Join?

    The newsletter goes out every Saturday. Subscribing takes less than thirty seconds.

    Subscribe to The Photographer’s Letter →

    I look forward to having you in the community.

    — Olivier, Photovag.art
    Landscape Photography · Scotland & Brittany · Since 1983

  • Capturing Périgord’s Gloomy Beauty: A Photographer’s Journey

    Capturing Périgord’s Gloomy Beauty: A Photographer’s Journey

    Bad weather could seem terrible for landscape photographer. But if you’re not afraid of the rain, your images could be stunning!

    The alarm didn’t go off, or maybe I just ignored it. It was the roof of the house that took charge of pulling me from my sleep. An incessant, rhythmic, merciless drumming. There is no need to open the insulated curtain to realize this. The Périgord is crying this morning. It’s crying big, cold tears.

    It is 5:30 AM. For everyone else, it’s an ungodly hour. For a landscape photographer, it’s the moment of truth, when the light is supposed to sculpt the world. Except today, the light seems to have been canceled. I drag myself out of bed with the flexibility of an old accordion. The air is humid.

    I open the shutter. The landscape is socked in. A thick, milky pea soup fog covers the dry-stone walls. It swallows the cows with their black-rimmed eyes less than ten meters away. A tourist would go back to bed. A beginner photographer would pack up their gear. Me? I smile. I smile because “bad weather” is a lie. There is only difficult light and inappropriate clothing.

    The Morning Ritual

    Coffee downed, the equipment choreography begins. It’s a war against water being prepped. I pull out the large waterproof backpack. I check the seals on my camera body—a near-religious reflex. I slide three dry microfiber cloths into my inner pockets—the photographer’s “white gold” in rainy weather.

    I decide to set out on foot. The spot I scouted last night on the IGN map isn’t far. It is an old ruined sheepfold. This place is isolated in the middle of a granite chaos. Under the sun, it’s a banal postcard. Under rain and fog, it can become a scene straight out of a gothic novel or a Tarkovsky film.

    Outside, the wind whips. It’s not raining vertically, but horizontally. Water tries to infiltrate everywhere—down the collar, up the sleeves. I walk, carbon fiber tripod on my shoulder like a rifle, boots sinking into the spongy peat of the plateau. The world is reduced to silence, muffled by the mist. I hear only the sound of my footsteps (squitch, squitch). The wind whistles through the tall grasses turned russet by autumn.

    The Dance of Patience

    I arrive in front of the sheepfold. It is suitably gloomy. Perfect.

    I deploy the tripod. I anchor it heavily into the soft ground to avoid vibrations. I mount the camera. And there, the battle begins.

    As soon as I remove the lens cap, the front element is a target. One drop. Two drops. I curse. I take out the golf umbrella I’ve rigged to clamp onto the tripod, creating a makeshift shelter. It’s precarious—the wind threatens to blow it all away—but it keeps my hands free.

    I’m not looking for color. Today, the world is monochrome. I set my camera to black and white directly in the viewfinder to better visualize the contrasts. I look for leading lines. The muddy path leading to the building. The rough texture of wet granite shining like metal.

    screw a neutral density (ND) filter onto the lens. It will allow me to extend the shutter speed to several seconds, even in daylight. The goal? I want to smooth out the movement of the low clouds. I also aim to transform the driving rain into a sort of ethereal mist.

    Click.

    Thirty seconds of waiting. I hold my breath so as not to shake the tripod. Water streams down my hood. I look at the world and I no longer see the cold, I no longer feel the dampness. I see infinite shades of gray. I see the raw melancholy of nature.

    The screen lights up. The image appears. It’s dark, dramatic. The sheepfold seems to float in a white void. The grasses, blurred by the wind during the long exposure, look like watercolor brushstrokes. It’s not reality; it’s a dreamlike interpretation of the real. That is why I am here.

    The Illusory Lull

    Around 11:00 AM, the rain calms down. The cloud ceiling lifts slightly. The light changes, becoming “flatter”. The drama fades. This is the hardest part: the transition between the photogenic storm and boring greyness.

    I change strategy. I swap my wide-angle for a telephoto lens (a 70-200mm). I leave the grand landscape for intimate details.

    I crouch in the mud, indifferent to the state of my pants. I spot a spiderweb beaded with thousands of droplets, an ephemeral jewel strung between two heather bushes. I photograph the water-saturated bark of a twisted beech tree. I capture resilience.

    It’s a meditative exercise. There is no one for miles around. Just me and this hostile nature that accepts me because I do not flee. The photographer’s solitude isn’t a punishment, it’s a luxury. It’s the only moment when you can truly listen to your own thoughts, punctuated by the shutter release.

    The Return to Base

    4:00 PM. The light is already fading. Winter is approaching. I’m soaked to the bone despite the technical layers. My fingers are numb; I struggle to unscrew the quick-release plate from the tripod. It’s time to head back.

    Returning to the house is a liberation. The heater purrs to life in minutes. The smell changes: shifting from fresh ozone to the warmth of drying. I lay out my gear like war trophies: the camera, lenses, filters spread out so they can acclimate slowly.

    I download the memory cards onto the laptop. This is the second moment of truth. With a cup of scalding hot tea in my hands, I scroll through the day.

    A lot of trash. Blurry photos (the wind), drops in the wrong place (the rain). And then, suddenly, the freeze frame.

    Number 148. The sheepfold.

    The contrast is perfect. The sky is threatening, heavy, textured. The stone in the foreground anchors the image. You can feel the cold just by looking at it. It’s not a “pretty” photo. It’s a true photo. It tells of isolation, harshness, and time passing and eroding everything.

    I lean back in the seat, satisfied. Outside, the rain starts up again with a vengeance, drumming once more. For others, it was a wasted day, good for staying under the duvet watching TV. For me, it was a prolific day. I captured the soul of the Périgord.

    Tomorrow, they’re forecasting sun. That’s a shame. Blue skies are so boring.

  • Drone is a fantastic tool for landscape photographers!

    Drone is a fantastic tool for landscape photographers!

    As a landscape photographer, I usually take pictures from the ground. But since I bought a drone, I can see the world as a bird does. Drone is a fantastic tool (toy) for landscape photographers, but it needs some practice to master the shots.

    This morning, I made this video to practice several editing techniques.

    I combined footage from different sources—drone, action camera—added ambient sounds, and synchronized the images with the music.
    It’s not perfect because I started with unplanned shots.
    Writing a script would have been better. Anticipating the scenes would have ensured smoother framing and drone movements.

    But I’m not unhappy with the result.

    My drone is a DJI Mini 3 pro and my sport camera a DJI Action 2 Dual screen.

    Of course, getting great aerial shots also depends on understanding light and exposure. The exposure triangle applies just as much to drone photography as to ground-level shooting — choosing the right aperture, shutter speed and ISO is critical when the light changes fast at altitude. For backing up all these drone files safely, my digital archiving workflow with a Synology NAS is essential.

    Some of the landscape scenes captured during these drone sessions have made it into the fine art print collection. Browse the shop to see the full series — limited to 30 copies, signed and produced by Whitewall.

    Why a drone changes everything for coastal landscape photography

    Ground level is where most landscape photographers spend their entire career. And for good reason — the relationship with the earth, the light hitting the rocks, the spray of the waves — all of that is felt at eye level. But a drone adds a dimension that simply doesn’t exist from the ground: the ability to reveal the geometry of a coastline.

    From the air, the Brittany coast becomes something else entirely. The patterns of rock and sea that are invisible from the shore — the way a reef emerges at low tide, the exact curve of a bay, the colour contrast between turquoise shallows and deep water — these only reveal themselves from above. It’s not a better perspective than ground level. It’s a complementary one, and for certain subjects, it’s irreplaceable.

    The real challenge: splitting your attention

    Here’s what nobody tells you before you buy a drone: piloting and making images at the same time is genuinely hard. Not technically — the DJI Mini 3 Pro is remarkably easy to fly. The difficulty is cognitive. Your brain is simultaneously managing flight safety, wind conditions, battery life, framing, exposure, and the movement of the drone through space.

    In my early sessions on the Brittany coast, I found myself so focused on keeping the drone stable in the coastal wind that I was barely thinking about the image. The shots were technically correct but visually flat — no intention, no composition, just documentation.

    The solution I’ve found: treat drone photography exactly like ground-level photography. Plan the shot before you launch. Know your subject, know the angle you want, know the light. The more decisions you make on the ground, the fewer you have to make in the air.

    DJI Mini 3 Pro — honest assessment for landscape work

    After several sessions on the Breton coast, here’s my honest verdict:

    What it does exceptionally well — image quality is genuinely impressive for a drone this size. The sensor handles coastal light well, and the ability to shoot in RAW gives you real flexibility in post-processing. The stabilisation is excellent, which matters enormously when you’re shooting long exposures or video over moving water.

    The real limitation: 20 minutes of flight time — this is the constraint that shapes every session. Twenty minutes sounds reasonable until you’re on a remote headland and you realise you’ve spent eight minutes just positioning for the shot you wanted. My workflow now: one battery, one subject, full preparation on the ground before takeoff. If a location deserves more coverage, I bring two batteries.

    Wind — coastal environments are where drones earn their keep and where they also show their limits. The Mini 3 Pro handles moderate coastal wind well, but a strong onshore wind on an exposed Brittany headland will drain your battery faster and limit your ability to hold a precise position. Always check the wind forecast before heading out.

    Practical settings for coastal aerial photography

    For still photography over the Brittany coast, my starting point:

    • ISO 100 whenever the light allows — coastal light is often bright and harsh, and keeping ISO low preserves the fine detail in water and rock textures
    • Aperture f/5.6 to f/8 — the sweet spot for sharpness on the Mini 3 Pro’s fixed-aperture lens equivalent
    • Shutter speed 1/500s minimum if there’s any wind — even a stabilised drone in wind introduces micro-movement that a slow shutter will capture

    For video, I follow the 180-degree rule: shutter speed twice the frame rate. At 25fps that means 1/50s, which often requires an ND filter in bright coastal conditions. The DJI ND filter set is worth having from day one.

    Regulations — what you need to know in France

    Drone regulations in France have tightened significantly. Before flying anywhere on the Brittany coast, check the Géoportail map for restricted zones — the coastal strip near military installations and certain nature reserves is off-limits. In the UK for Scotland shoots, the CAA’s DroneAssist app is the equivalent tool.

    The DJI Mini 3 Pro at 249g stays under the weight threshold that triggers the most restrictive regulations in both France and the UK, which is a genuine practical advantage beyond just portability.


  • Photovag VLOG # 2  Composition: Legacy of Painting in Photography

    Photovag VLOG # 2 Composition: Legacy of Painting in Photography

    The November issue of my VLOG dedicated to photography, Photovag magazine is now online.

    Read the in-depth feature on composition and how the legacy of painting has influenced photographers over the years.

    We’ll be following in the footsteps of Robert Doisneau for a Parisian stroll. We are inspired by his visit to the exhibition dedicated to him at the Musée Maillol.

    I was touched by Doisneau’s genius during this visit. I was deeply inspired by the graceful and attentive demeanor of this very chic Parisian woman. The perfect balance of lighting allows me to offer you a superb fine art print. The dynamic range offered by Leica cameras enhances it further. This print is available to order online.

    Discover Doisneau’s work through this beautiful edition from Taschen.

    I’ll see you on December 6th for a new episode.

    In the meantime, feel free to comment and send me your suggestions for future stories. You can also book a workshop on composition.

  • The Secrets of the Seine: A Romantic Parisian Journey

    The Secrets of the Seine: A Romantic Parisian Journey

    The Seine, a silver ribbon draped through time, Unfurls its secrets in the city’s chime. Beneath the gaze of Notre-Dame’s old stone, A silent witness where the seeds of love are sown.

    The quais breathe deep, cool air of centuries past, Where whispered history’s shadow is cast. Bouquinistes tend their treasures, worn and rare, In emerald boxes, catching morning’s glare.

    The light descends, a painter’s subtle hand, On wrought-iron bridges spanning the land. From Pont Neuf to Pont des Arts, the currents glide, Reflecting streetlamps on the turning tide.

    A melody of footsteps, soft and low, As lovers wander where the old lamps glow. The scent of night-blooming jasmine and damp stone, A quiet peace where one is truly known.

    To walk the Seine is to embrace the soul of Paris, Where every ripple holds a gentle kiss. A timeless journey, measured not by pace, But by the magic of this cherished place.

    Contact me if you want to take a walk there with your camera. I’ll be happy to share my best POV with you

  • Paris is a dream for photographers

    The major metropolises are overflowing with resources for photographers, but we sometimes tend to forget this. Let’s take Paris as an example. It is October, and the weather is neither good nor bad. Why not take the opportunity to stroll with your camera? Starting from the Montparnasse district, after a hot coffee on Boulevard Raspail, head towards Le Marais. Taking a few pictures while crossing the Seine is always beneficial… Our walk leads us to the European House of Photography. This venue is currently paying tribute to three photographers. They are Tyler Mitchell, Felipe Romero Beltran, and especially Edward Weston.

    A few streets away, you can find the Memorial of the Shoah. It is an opportunity to discover Raymond Depardon’s work on Auschwitz.

    At the end of the street, we find the Seine and its soft colors in this season. Along the banks, the bridges provide perfect frames to showcase the Parisian landscapes. I explored the secrets of the Seine in a full photo essay — the quais, the bouquinistes, the bridges lit by autumn light.

    On the way back, let’s push open the door of the Roger Viollet gallery. Discover the work of Gaston Paris and his magnificent square prints.

    Paris is endlessly photogenic, and some of these Parisian walks have produced images now in the shop. The Eiffel Tower in the morning sun, Odéon’s back, and Loneliness are all available as limited edition fine art prints — signed, numbered, and produced by Whitewall. To understand how I capture these scenes technically, the exposure triangle guide explains the key settings behind every image.

  • Stunning French Pyramid at Le Louvre

    Stunning French Pyramid at Le Louvre

    When modernity meets tradition

    The French Pyramid at Le Louvre, thoughtfully designed by architect I. M. Pei, stands as a welcoming entrance to the Louvre Museum in Paris. Completed in 1989, this stunning glass and metal structure reaches a height of 21.6 meters and is adorned with 673 diamond-shaped panels that beautifully reflect the light, creating a magical experience for visitors. The pyramid has become an iconic symbol of modern architecture, harmoniously blending with the historic grandeur of the surrounding Louvre buildings, inviting all to appreciate the rich history and culture housed within.

    A place to visit when in Paris

    Visitors are utterly spellbound by the breathtaking clash of contemporary design set against the timeless grandeur of the classical backdrop, rendering it an unmissable landmark for anyone eager to dive into the rich tapestry of art and history that resides within the museum’s expansive collection.

    The day was magnificent. The sun was shining on this beautiful September day, with many tourists still in Paris.

    Which gear to use ?

    As I had in mind the type of photo I wanted to take, I brought my DSLR and three lenses. Then it was easy to combine wide-angle images and telephoto effects to capture the details of glass, steel, and stone.

    I was also fortunate to encounter elegant strollers. You can find more stunning people here

    My precious !

    I also realized that despite the beauty of the place, many visitors are more focused on their smartphones rather than this architectural masterpiece.

    What a strange era!

    Bad views made bad images

    Taking the shot is a key step in achieving beautiful images. However, for this series, I continued the work in the studio. Most of the images are cropped, and the exposure and contrast are reviewed. For some, black and white processing seemed more suitable. In this case, the blacks are made deeper, and the whites more pronounced. This is true for this stunning woman, for whom it was necessary to work on very specific areas.

    If you would like to be guided on a photo outing in the neighborhood, at the Tuileries, and along the Seine, feel free to send me a message so that we can plan an outing together.

  • Paris is Typical of French Art de Vivre Summer 2025

    Paris basks in the golden embrace of summer’s final rays, just before it transforms into a breathtaking canvas of autumn hues.

    The city is alive with a delightful tranquility; not all Parisians have returned, traffic flows effortlessly, and the tourists linger just a little longer.

    This enchanting moment is perfect for encountering the flâneurs, who savor the wonders of the capital with every leisurely step. Picture yourself relishing a rich coffee on a sunlit terrace, delighting in exquisite pastries, and indulging in the elegance of a chic department store—it’s pure, unfiltered LIVING!

    I poured my heart into capturing this evocative atmosphere as I meandered through one of my favorite neighborhoods. It is with heartfelt enthusiasm that I share these images, hoping you find as much joy in them as I experienced in their creation.

  • Paris incarne l’Art de Vivre à la française – Été 2025

    Paris se prélasse dans l’étreinte dorée des derniers rayons de l’été, juste avant de se transformer en une toile à couper le souffle aux teintes automnales.

    La ville est animée d’une tranquillité délicieuse ; tous les Parisiens ne sont pas encore rentrés, la circulation est fluide, et les touristes s’attardent un peu plus longtemps.

    Ce moment enchanteur est parfait pour rencontrer les flâneurs, qui savourent les merveilles de la capitale à chaque pas nonchalant. Imaginez-vous déguster un café corsé sur une terrasse ensoleillée, vous délecter de pâtisseries exquises et vous abandonner à l’élégance d’un grand magasin chic — c’est VIVRE pleinement, sans filtre !

    J’ai mis tout mon cœur à capturer cette atmosphère évocatrice en déambulant dans l’un de mes quartiers préférés. C’est avec un enthousiasme sincère que je partage ces images, en espérant que vous y trouverez autant de joie que j’en ai éprouvé en les créant.