Photography Tips · April 2026 · 9 min read
Mastering ND filters is the step that takes you from technically correct coastal shots to images that actually hold the feeling of the Atlantic.
Estimated reading time: 9 minutes
Table of Contents
- Why ND Filters Change Everything
- What Is an ND Filter, Exactly?
- Choosing the Right ND Filter
- Calculating Exposures in the Field
- Field Technique: Coastal Specifics
- My ND Filter Kit for Atlantic Coasts
- Start Simple, Shoot Intentionally
This guide covers everything you need to use ND filters for long exposure coastal photography: how they work, which ones to buy, how to calculate exposures in the field, and the specific techniques I use on the coasts of Brittany and the Isle of Skye. I’ve been shooting long exposures on the Atlantic for over 40 years — here’s what actually works.
Why ND Filters Change Everything in Coastal Photography

It’s five in the morning at Belle Ile. The tide is going out, the wind is offshore, and there’s a long bay between you and the horizon. The light is grey-pink and soft. You set up the tripod, frame the shot — and the image you capture looks like a postcard. Fine. But not what you felt standing there. Long exposure coastal photography is about capturing what the eye perceives but the camera, left to its own devices, cannot.
The missing ingredient, almost always, is time. A long exposure turns the sea into silk, blurs the clouds into motion streaks, and removes the visual noise of breaking waves — leaving only structure, light, and atmosphere. That is what ND filters are for. They are, simply, very dark glass that forces your camera to keep its shutter open much longer than it otherwise could.
Without an ND filter, achieving a 30-second exposure in daylight is impossible — even at f/16 and ISO 100, your sensor would be completely overexposed. The ND filter is what makes the long exposure possible at any hour, in any light. It’s the single most important tool in coastal landscape photography after the tripod itself.
What Is an ND Filter, Exactly?
An ND (Neutral Density) filter is a piece of optically neutral grey glass or resin that reduces the amount of light entering your lens. “Neutral” means it doesn’t shift colour — it simply dims. The effect is that for any given aperture and ISO, your camera needs a longer shutter speed to achieve the same exposure. That extended shutter speed is what creates the motion blur that makes coastal long exposures so distinctive.
The concept is elegantly simple: you’re not changing what you photograph, you’re changing how long the sensor looks at it. A wave that crashes and retreats in two seconds becomes a smooth, continuous surface over 30 seconds. Clouds that move across the sky become directional streaks. The ND filter doesn’t create the effect — it gives time the room to create it for you.
Understanding the Stop System
ND filters are rated in stops. One stop halves the amount of light — which means doubling your shutter speed. The most common ratings you’ll encounter:
| Filter | Stops | Shutter multiplier | Typical use |
|---|---|---|---|
| ND4 | 2 | ×4 | Bright overcast |
| ND8 | 3 | ×8 | Soft light, moving clouds |
| ND64 | 6 | ×64 | Golden hour waves |
| ND1000 | 10 | ×1000 | Midday, glass-smooth sea |
Field note: On the Atlantic coast, I use the ND1000 for 80% of my work at golden hour — the light is already low, and 10 stops is enough to get 30–60 second exposures without going to ISO 50.
Understanding the stop system also unlocks the exposure triangle in a much more practical way — aperture, shutter speed and ISO are all part of the same balancing act, and the ND filter is simply a way of shifting that balance toward longer exposures without compromising depth of field or introducing noise.
Choosing the Right ND Filter for Coastal Work

Screw-In vs. Square System
For coastal photography, I recommend a square filter system (100mm or 150mm). Here’s why: you will nearly always be stacking an ND filter with a graduated ND (to balance a bright sky), and screw-in filters make this very difficult. A square system holds both in the same holder, and lets you position the grad precisely on the horizon.
The main square filter brands are Lee Filters, NiSi, and Kase. They are expensive but optically excellent. If you’re starting out, a quality screw-in ND64 and ND1000 is a perfectly valid approach — just be aware of the stacking limitation. I use the NiSi system.
💡 TIPS — Square Filter System: Pros & Cons
✅ Pros
- Stack ND + Grad ND in the same holder — essential for balancing bright coastal skies
- Grad ND fully adjustable: position the transition line precisely on the horizon
- One holder works across all your lenses (with adaptor rings)
- Easier to attach and remove quickly in the field, even with cold or wet hands
- No vignetting at wide angles (unlike screw-in filters)
❌ Cons
- Expensive initial investment (holder + rings + filters)
- Bulkier to carry than screw-in filters
- Risk of light leaking around the holder in very bright conditions — use the foam seal
- Salt spray can reach the rear element more easily — clean thoroughly after coastal shoots
- Learning curve to assemble quickly on location
Variable ND Filters: Tempting but Flawed
Variable ND filters seem ideal — one filter, infinitely adjustable. In practice, they have two significant weaknesses: colour cast (especially at higher densities) and an X-pattern cross effect that appears at maximum density. On coastal landscapes where colour accuracy matters, I avoid them for serious work.
Starter kit suggestion: ND64 + ND1000, screw-in, from a brand like Hoya or B+W. Add a square system when you’re ready to explore grad NDs seriously.
Calculating Long Exposures in the Field

This is the part that intimidates beginners, but the maths is simple once you understand the stop principle. The method has two steps: establish your base exposure without the filter, then multiply.
The Two-Step Method
- Set your camera to aperture priority or manual mode. Choose your aperture (typically f/8–f/11 for landscapes) and ISO 100.
- Take a test shot without the filter. Note the shutter speed the camera gives you — this is your base exposure.
- Multiply this shutter speed by the filter’s multiplier (see table above). An ND64 multiplies by 64. If your base is 1/60s, your filtered exposure is 64/60 ≈ 1 second.
- Set your camera to Bulb mode for exposures over 30 seconds. Use a remote shutter release.
A Practical Example from Belle Ile
Mid-morning, overcast sky. Base exposure: f/9, ISO 100, 1/30s. I reach for the ND1000 (10 stops, ×1000). Filtered exposure: 1000/30 = 33 seconds. I set Bulb, count to 33, and the cloud movement in those 33 seconds becomes a beautiful directional blur above the pinnacles.
Pro tip: Use a phone app like ND Calc or Long Exposure Calculator rather than doing mental maths in the field, especially when stacking two filters. Personally, I use the NiSi app, which indicates the exposure time based on the filter and the base exposure.
Field Technique: Coastal Specifics
Focus Before You Filter
This is the most common beginner mistake. Through a 10-stop filter, your viewfinder is nearly black and autofocus will hunt or fail entirely. Always: compose and focus first, switch to manual focus to lock it, then attach the filter. On modern mirrorless cameras, live view amplifies the signal and you may be able to focus through the filter — but I still don’t rely on it for critical shots.
Working with Tides
Tide state fundamentally changes what an ND filter does to your image. At low tide on a flat rocky shelf (common on the Finistère coast), a 30-second exposure creates flat, glassy water with the rocks emerging like islands. At mid-tide, the same exposure captures the energy of swell moving over submerged rocks — more dynamic, more white water. At high tide, you’re often photographing pure sea motion without foreground texture.
There is no “correct” tide for long exposure — but there is a right tide for the image you have in mind. I always look at the tide chart before I plan a shoot, not after. Reading the tide table correctly is a skill in itself — one that transforms your hit rate on coastal shoots.
📥 Download the free guide: “Tide, Light & Timing” — my complete system for planning coastal shoots around tides, golden hour and weather. Available at photovag.art
The Colour Cast Problem
Cheaper ND filters introduce a colour cast — typically a magenta or green tint. Shoot in RAW and correct in Lightroom. In Camera Raw, use the “Eyedropper” white balance tool on a neutral grey area of the scene to neutralise the cast in one click.
On Atlantic coasts, I actually embrace a slight warm cast in post-processing — it complements the golden coastal light of Brittany and the warm granite tones of Skye.
My ND Filter Kit for Atlantic Coasts

After 40 years of coastal photography between Brittany and the Hebrides, this is what I carry:
- ND1000 (10 stops) — the workhorse: midday, glass-smooth sea, cloud streaks
- ND2000 (11 stops) — extreme midday brightness, summer light
- Soft Grad ND (3 stops) — for balancing bright Atlantic skies. The horizon on coastal shots is almost always the brightest part of the frame.
- Circular Polariser — not an ND filter per se, but essential to reduce glare on wet rocks and deepen the colour of rock pools.
Thanks to the filter holder, I can combine different filters to achieve the desired result and, above all, the ideal shutter speed for the conditions. Stacking the ND1000 with a 3-stop Grad, for instance, lets me balance a bright sky while still getting the long exposure I want on the water — something impossible with screw-in filters.
Start Simple, Shoot Intentionally
The most important thing about ND filters is not the brand or the stop count — it’s the intention behind their use. Before you attach the filter, ask yourself: what do I want time to do to this scene? Do I want the sea to become silk, or to show its movement? Do I want the clouds to streak, or to freeze?
An ND filter is not a magic button. It’s a tool for controlling time — and on the Atlantic coast, where light, tide, and weather converge in endlessly changing combinations, that control is what allows you to translate the feeling of a place into a photograph that actually holds it.

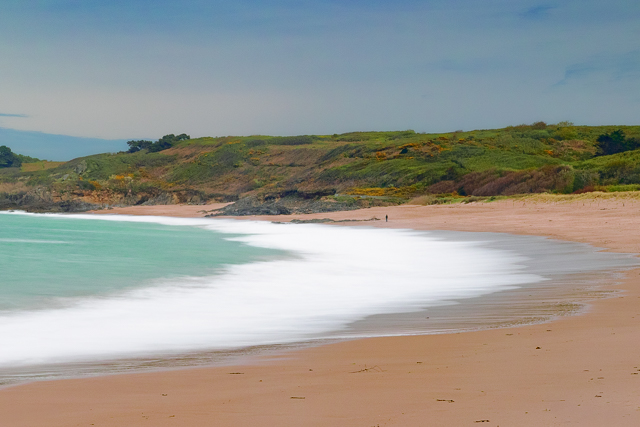
While this type of image is spectacular in colour, like this view of the westernmost tip of Europe at the Pointe de Corsen, a black and white art print takes on an unparalleled dramatic dimension — stripping out the colour leaves only light, texture and time.

Explore how these principles shape my own coastal work in the portfolio →
A complete step-by-step guide will soon be available in the “Learn” section, detailing all the stages of a long-exposure coastal shoot from location scouting to final export. Feel free to contact me directly at photovag.landscape@gmail.com for personalised advice.
📥 Found this useful? Download the free guide “Tide, Light & Timing” at photovag.art